This represents a list of the different ways that I use whiteboards for problem solving in my physics classroom. They all have some things in common. First is that students are always randomized with limited exceptions. I want a classroom environment where throughout the course of the semester, each student has a chance to work with every other student in their class. I believe that this drives student collaboration and increases their ability to work with others in all situations, which is a valuable life skill. You aren’t always going to work with your friends or even people you like. Generally, my groups are going to be groups of three, and if the number of students doesn’t divide into 3 evenly, I’ll allow a few groups of 2. Groups of 4 are not advisable because they will not have a specific and unique role.
Second, students are always going to have assigned roles in their groups. This is also randomized so every student will get an opportunity to practice each role. Generally my roles are presenter, calculator, and scribe. My presenter is responsible for presenting the information on the board either to the entire class or to students who have questions about their board. This person is practicing their interpersonal skills. My calculator is responsible for all calculator work and coming up with the numerical answer. This person is practicing their math skills. Finally, the group scribe is really practicing active listening and asking clarifying questions. The scribe is the only group member who is allowed to write on the board. If someone else has an idea, this idea must be conveyed to the scribe. If the scribe is confused about what to write, they will be forced to ask clarifying questions. Noticed what I have done with this set up as it pertains to Science and Engineering Practices (SEP’s) laid out in NGSS. Communicating scientific ideas, using computational thinking, and asking clarifying questions are all considered SEP’s.
Third is that in general, the groups are going to be changed around by the movement of students from one group to the next. Think of this like you think of speed dating. Lots of movement that might cut off collaboration and force you to collaborate with an entirely new group of individuals. I have a bunch of different ways of accomplishing this and I always just go with what feels right in the moment. What this often looks like is that I’ll call the class to pause, then ask each scribe to go to a different group. Not a group of their choosing but usually a specific group number, such as group 5’s scribe being forced to move to group 6. It doesn’t have to be the scribe, and I’ll change it each time such as group 4’s presenter being moved to group 3 and so on. I like to have at least 3 movements to mix things up.
There are generally two things that are going to change from one whiteboarding session to another and those are the types of questions they are solving and how the boards are presented to the class. I’ll try to lay these out below to the best of my ability but once you get accustomed to whiteboarding, you will improvise and use your heart and mind to come up with new and interesting ways to whiteboard.
Types of Questions:
1. Goalless whiteboarding with each group getting the same scenario, graph, or other representation with no real direction on what to do with that problem. I tell them to write as much as they possibly can about a particular situation using what they have learned from class. Here is an example:
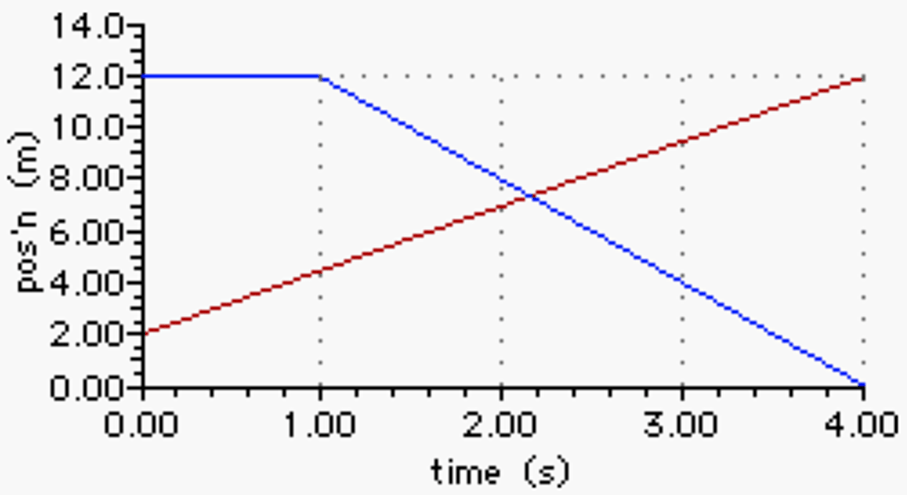
Think of all the amazing things you could write about this graph. You can calculate velocity, time interval, change in position, compare and contrast the two objects, or even imagine a scenario that fits the graph. The kids often surprise me with how much they come up with and the creativity they use to solve this goalless problem.
2. DIY review questions where students are given a similar scenario to the above but rather than asking them so write answers down, or come up with some solution, they are asked to come up with potential questions that I may ask if that graphic were on their test.
3. Practice problems with one concept, so one equation or group of equations with multiple different scenarios that need to be solved. Each group would get a different question that would be answered with the same equation.
4. Practice problems with multiple concepts, so each group has a different problem or scenario, and it takes the use of different equations to solve each problem. This is useful for review.
5. Backwards problems, where I give them the answer I’m looking for and they have to develop the problem or scenario that would lead to that particular answer.
Types of Presentations
1. Gallery Walk where everyone but the presenter is asked to travel around the room and visit the other boards. The presenters stay behind to explain how their group solved the problem.
2. Guided Gallery Walk where I lead the walk from board to board pointing out correct and incorrect information and discussing it with the kids.
3. First place board where I pick the one board that is most correct for a common problem and asking each group to send a representative to compare what they have written to what is written on the first place board.
4. Classroom presentations where each group comes to the front of class and presents both the question, the solving process, and the answer. I ask questions about their boards as they present and I do check them for correctness. If an answer is incorrect, we fix it on the spot.
Through mixing up the different question types, the different ways to rotate students from group to group, and the different presentation styles, I am able to keep things feeling new and interesting. Some types of problems lend themselves to the different types of presentation, which is another thing I consider when putting this all together. Again, I’ve been doing this for 16 years so I just come up with all of this on the fly, but you can do whatever you want to make this your own. The students will know if you are forcing it, so it’s best if you come up with your own style. My problem sets can be found in the curriculum folders on this site.

Leave a comment